Explore muse.ai features and learn how to use this video hosting platform to its full potential.
Upload videos and start your journey on muse.ai.
Record a video of yourself or your screen, and upload it directly to your muse.ai account.
Manage your account. Update username, password, and more.
Manage your videos, create collections, set visibility controls, and more.
Easily set-up a branded streaming platform for your content, complete with custom tiers & subscriptions. All in one place.
Collections are groups of videos you can create and share with anyone.
Each muse.ai account has a customizable Channel, which gathers all its public videos and collections.
Search for anything in your collection or within a single video.
Share your video with anyone.
Create custom labels and edit automatic detections with ease.
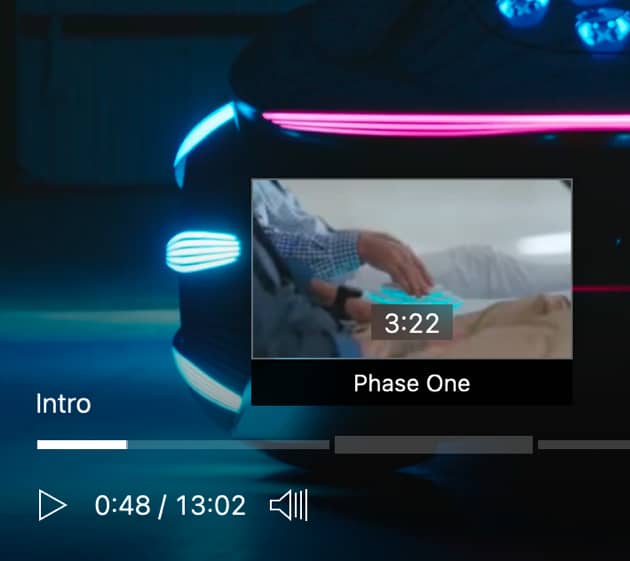
Save and share the best moments of any video by cutting clips of its highlights.
Embed your videos anywhere on the web.
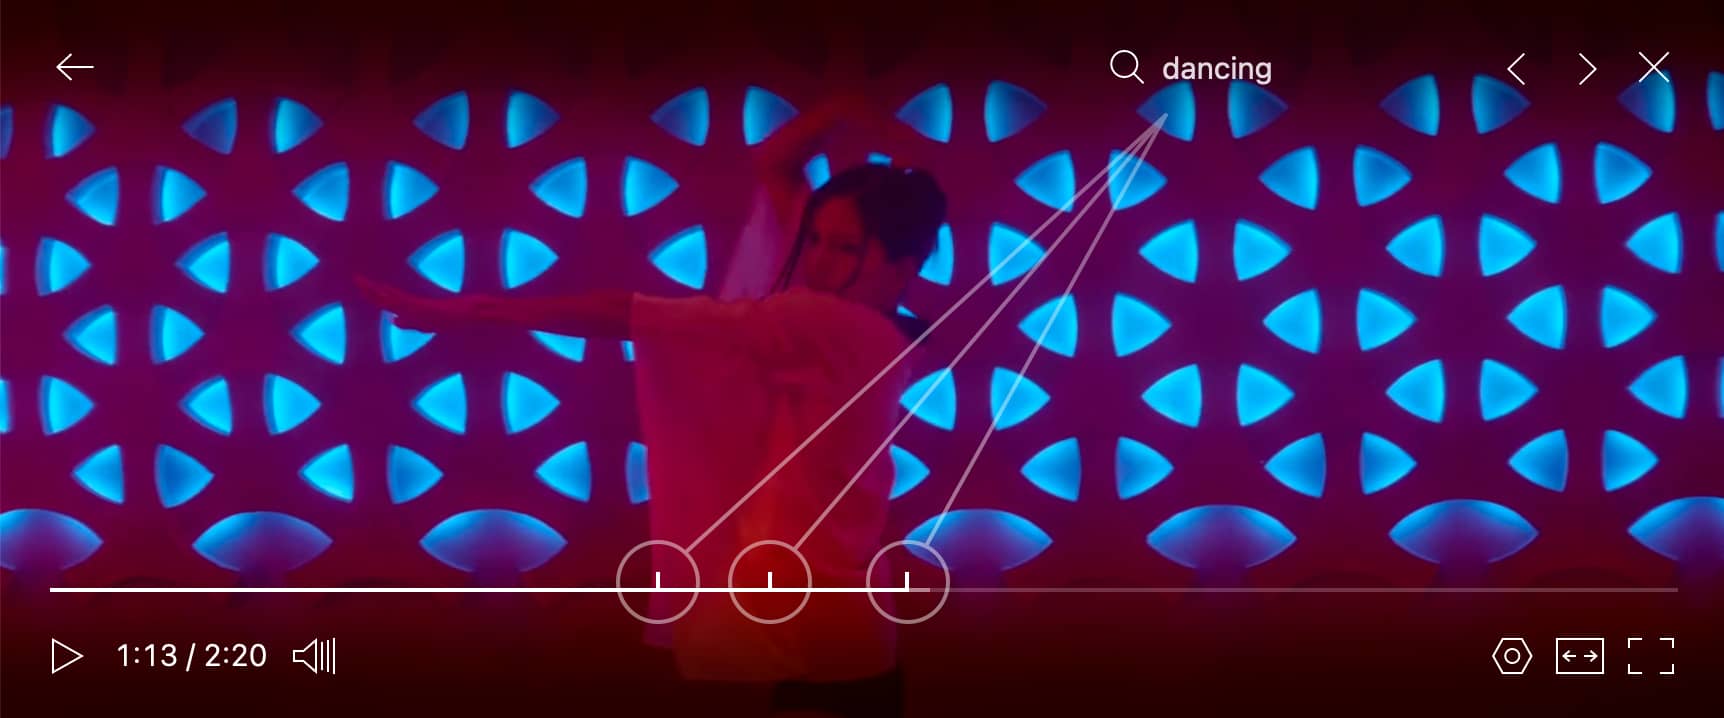
Clean and powerful video player with in-video search.
Embed searchable collections anywhere on the web.
Ready-made HTML pages with embedded videos, transcriptions, descriptions and more.
Access our APIs and build your own solutions.
Frequently asked questions.
You can upload videos to muse.ai by dragging-and-dropping any video into the muse.ai grid, or simply click on the upload button on the top-right corner.
You can also record a video of yourself or your screen, and upload it directly to your muse.ai account.
Easily rename, download, change visibility, share and delete videos using the muse.ai interface.
Studio mode is your personal area, from which you can manage all your videos and collections, no matter their visibility.
To manage your video, you need to be in Studio mode. Switch any time by clicking on the icon on the top-right, then selecting Studio.
Portals are an all-in-one custom subscription service for your content. Easily create a beautiful page for your videos and start start onboarding your audience!
Collections are groups of videos you can create and share with anyone.
Click and drag collections and subcollections to reorder them.
Each muse.ai account has a customizable Channel, which gathers all its public videos and collections. Your channel acts as a hub for your public content, and is a great way to share it with your audience. Private, Unlisted and Hidden videos will not show on the channel.
Immersive view is an alternative design for your collections. You can use immersive view to showcase a Collection and its videos to people who don't have a muse.ai account, or simply to share a Collection in a stylish way.
Video content search is one of the unique features of muse.ai and completely changes how you and your viewers interact with video content.
When you search your videos you can get two types of results:
Note: Smart search is currently only available when searching among all your videos in the Studio view and needs to be enabled in Preferences first.
f:musk o:car s:tesla will return videos with faces that match "musk", objects that match "car", and speech that matches "tesla". You can combine them all, in any number.how hot is it in mars?, or mysterious lights.Narrow down your keyword search to a certain category or categories by using search filter modifiers.
| Speech | s:keyword | Searches for words that are said in the video |
| Faces | f:keyword | Searches for people whose face appear in the video |
| Text | t:keyword | Searches for text that appears in the video |
| Objects | o:keyword | Searches for objects that are visible in the video |
| Actions | a:keyword | Searches for actions that are performed in the video |
| Sounds | z:keyword | Searches for sounds that can be heard in the video |
| Title | n:keyword | Searches for titles (names) of videos |
| Description | d:keyword | Searches for descriptions of videos |
 icon
iconmuse.ai fully supports oEmbed, allowing compatible websites to display embedded content from just a regular link. This is useful for social media websites, website builders, and more.
Check oEmbed compatibilityOn muse.ai, you can label anything.
Save and share the best moments of any video by cutting clips of its highlights.
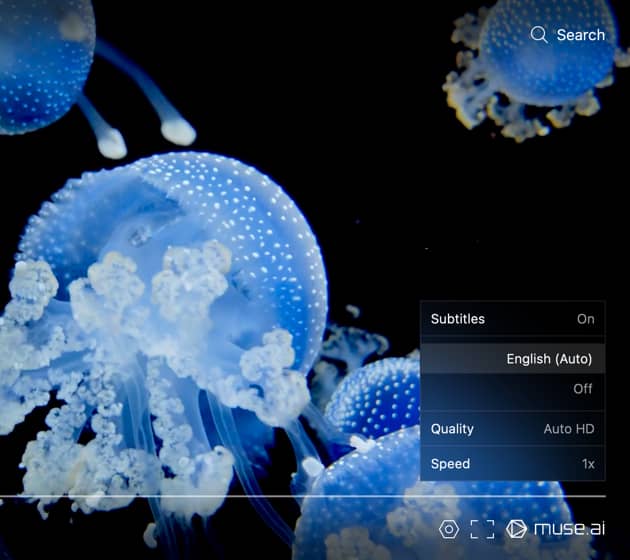
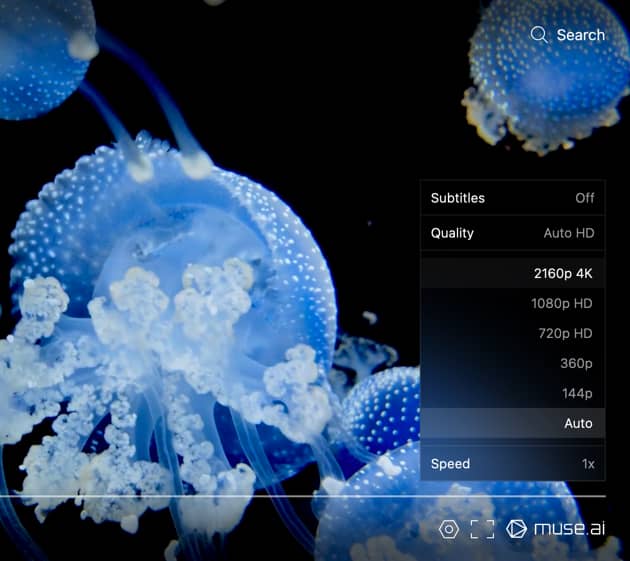
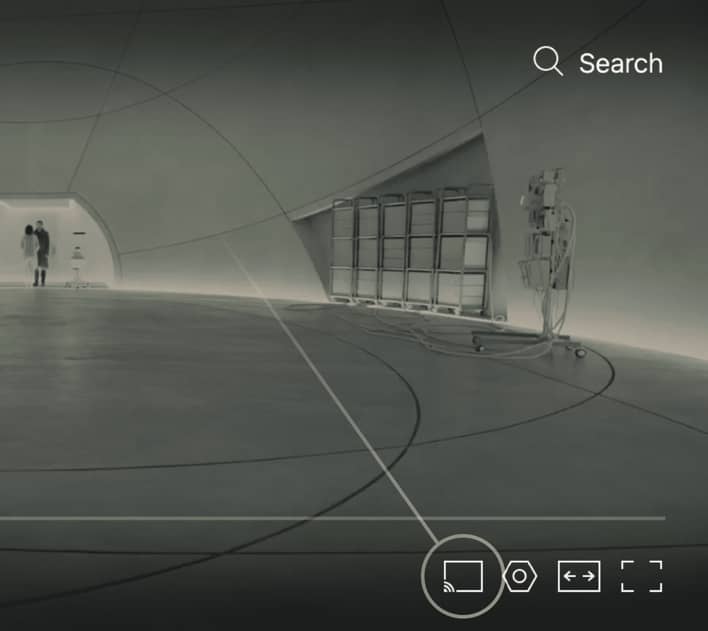
Stream videos in 4K with DASH/HLS streaming, cast to any screen using Chromecast or AirPlay, and search for anything inside your videos using the muse.ai HTML5 responsive video player.
[space] / k |
Play / Pause |
l |
Skip 10 seconds |
j |
Back 10 seconds |
. |
Next frame |
, |
Previous frame |
► |
Skip 5 seconds |
◄ |
Back 5 seconds |
▲ |
Volume up |
▼ |
Volume down |
f |
Toggle fullscreen |
s |
Focus search field |
You can style the muse.ai player in order to match your website, logo or outfit!
We offer some styling options when generating the embed code, but you can also use CSS to get creative. To do so, you will need to:
data-css attribute with your CSS to the player <div>. E.g.:<div data-css="your_css_here" data-video="y8zH87z" class="muse-video-player"></div> <script src="https://muse.ai/static/js/embed-player.min.js"></script>
css parameter to the iframe URL. E.g.:
<iframe src="https://muse.ai/embed/y8zH87z?css=your_css_here"
        width="576" height="324" frameborder="0" allowfullscreen></iframe>
css parameter. E.g.:
MusePlayer({css: 'your_css_here' container: '#video-player', video: 'sLFaX4p'});
Below are some examples you can try out. To edit them live, click on the "Edit in JSFiddle" button to expand the examples.
Our standard embed codes work on Wordpress webpages. However, some Wordpress hosting services don't allow for custom scripts. To address these cases we also provide an option to embed your video in an iframe. You can toggle this option by checking the Use iframe checkbox in the embed modal.
The Squarespace free plan only allows for iframe embed codes, which you can get by checking the Use iframe checkbox in the embed modal. To use our standard embed codes, you will need to upgrade your Squarespace plan.
Clean yet powerful embedded video player you can customize to your needs.
To embed our player on your website you only need two lines of code:
STANDARD
<div class="muse-video-player" data-video="y8zH87z" data-width="600"></div>
<script src="https://muse.ai/static/js/embed-player.min.js"></script>
IFRAME
<iframe src="https://muse.ai/embed/y8zH87z?start=20&volume=75"
        width="576" height="324" frameborder="0" allowfullscreen></iframe>
For the STANDARD method, simply set the data-video value to your video ID, which you
can find in the address bar of your video on muse.ai.
If you have more than one video on your page, you only need to include the
<script> tag once. It's also a good practice to place it
in the <head> section or at the bottom of the
<body> section.
You can configure the player size by setting the data-width or
data-height attributes. If neither of them is set the player
will default to 640x360.
You can configure the following values:
data-video | Video ID. |
data-width | Player width. Can be provided as pixels (e.g. "560") or a relative value (e.g. "100%"). |
data-height | Player height. Can be provided as pixels (e.g. "560") or a relative value (e.g. "100%"). |
data-autoplay | Set to "1" to play the video automaticaly. Set to "visible" to play when video enters the viewport. |
data-loop | Set to "1" to restart the video after it finishes. |
data-start | The time at which the video should start playing. |
data-resume | Set to "1" to seek back to the last viewing position when the video loads. |
data-volume | Set volume to a value between 0 and 100. |
data-consent | Set to "1" to indicate the viewer has already given consent to view sensitive content. |
data-share | Set to "1" to show a share icon in the player. |
data-subtitles | Enable subtitles by default, set to "auto" to show automatically generated subtitles, or set to the name of uploaded subtitles. |
data-shortcuts | Set to "0" to disable keyboard shortcuts. |
data-download | Set to "1" to enable downloads. |
data-controls |
Enable or disable player controls. A comma-separated list of controls prepended with plus or minus signs. E.g. "-fullscreen,+subtitles" will show a subtitle toggle and hide the fullscreen toggle. |
data-playlist | Either a collection ID or a comma-separated list of video IDs to play in a sequence. |
data-ld | Set to "0" to disable Linked Data markup. Enabled by default. This helps with SEO by hinting search engines to also display this page in the video category. |
data-ad | Include VAST / VPAID / VMAP tags to show your own ads. |
Embedding on Wordpress, Squarespace, or Wix pages? See Player integrations.
If you want more control over the player and its interactions with your website, you can use the JavaScript library. This allows you to programmatically create the player and access more of its functions.
To use the JavaScript library you will first of all need to include the following embedded player script (see "Simple usage"). Then, creating an instance of a player is easy:
<div id="your-container"></div>
<script src="https://muse.ai/static/js/embed-player.min.js"></script>
<script>
  const player = MusePlayer({
    container: '#your-container',
    video: 'y8zH87z',
    width: 400
  });
</script>
Using the player object you can perform basic operations on
your video. For example, to pause the video, call player.pause().
MusePlayer parameters:container | HTML element that will contain the player. |
autoplay | Set to true to play the video automatically. Set to 'visible' to play when video enters the viewport. |
loop | Set to true ro restart the video after it finishes. |
start | Time at which the video should start playing. |
resume | Set to true to seek back to the last viewing position when the video loads. |
volume | Set volume to a value between 0 and 100. |
width | Desired player width. Can be provided
as an integer (in pixels) or a relative value as a string (e.g.
'100%'). |
height | Desired player height. Can be provided
as an integer (in pixels) or a relative value as a string (e.g.
'100%'). |
title | Set to false to hide the title. |
search | Set to false to hide the search functionality. |
links | Set to false to disable links to muse.ai. |
sizing | Set to 'fill' to
indicate that the player should fill the entire container's size and
introduce black bars as necessary. Set to 'fit' to span
the parent container while maintaining the player's aspect ratio. Set
to 'cover' to span the parent container disregarding the
player's aspect ratio. When using these values make sure that the
container's parent has explicit width and height that don't
depend on the player. If sizing is set,
width and height will be ignored. Default:
null. |
logo | Set to false to hide branding on the player. |
style | Set to minimal for minimal player controls, and to no-controls to hide controls entirely. |
consent | Set to true to indicate the viewer has already given consent to view sensitive content. |
linkedData | Set to false to
disable Linked Data markup. Enabled by default. This helps with SEO by
hinting search engines to also display this page in the video category. |
share | Set to true to show a share icon in the player. |
subtitles | Enable subtitles by default, set to 'auto' to show automatically generated subtitles, or set to the name of uploaded subtitles. |
shortcuts | Set to false to disable keyboard shortcuts. |
download | Set to true to enable downloads. |
controls |
Enable or disable player controls. A list of control names
prepended with plus or minus signs. E.g. ["-fullscreen", "+subtitles"]
will show a subtitle toggle and hide the fullscreen toggle.
|
playlist | Either a collection ID or a list of video IDs to play in a sequence. |
ad | Include VAST / VPAID / VMAP tags to show your own ads. |
MusePlayer methods:play() | Play the video. |
pause() | Pause the video. |
seek(time) | Skip to the specified time. |
search(query, seek) |
Search using the provided query. Set the seek argument to true to
seek the video to the first result after performing the search.
|
on(event, listener) | Set up a function that will be called when the specified event happens. |
off(event, listener) | Remove a previously set up event listener. |
setVideo(video) | Load the video into the player from the given video ID. |
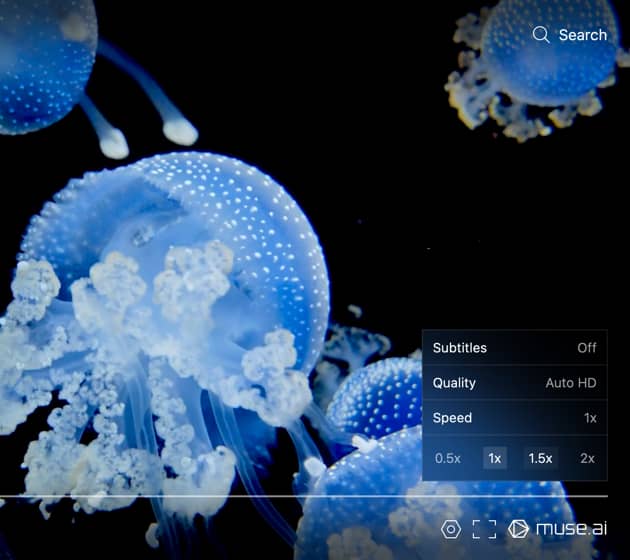
setSpeed(rate) | Set the rate at which to play the video. |
setVolume(volume) | Set volume to a value between 0 and 100. |
MusePlayer events:play | Video is playing. |
pause | Video is paused. |
ended | Video has ended. |
metadata | Player metadata (such as title, description, width, and height) is ready. The metadata object will be passed to the listener as the first argument. |
timeupdate | Event fired when the playback time of the player changes. The current playback time in seconds will be passed to the listener as the first argument. |
search | A search is performed. The query string will be passed as the first argument. |
speed | Playback speed changed. The new speed is passed as the only argument. |
For example:
player.on('metadata', metadata => {
  document.getElementById('video-title').innerText = metadata.title;
  document.getElementById('video-description').innerText = metadata.description;
});
You can also embed video metadata such as description, transcript, and detected text that appears in the video straight into your website. This is especially useful for rendering full embedded video pages in your websites, and an unparalleled way to do search engine optimization for your videos. Here's the code that you'll need:
<div class="muse-video-data" data-video="FTBViRx" data-content="description"></div>
<script src="https://muse.ai/static/js/embed-player.min.js"></script>
Note that you can skip the <script> line if you already have it elsewhere on that page.
data-content values:description | Video description. |
speech | Video transcript. |
objects | A list of detected objects that appear in the video. |
scenes | A list of distinct scenes in the video. |
sounds | A list of distinct sounds in the video. |
text | A list of detected words that appear in the video as printed text. |
actions | A list of distinct actions in the video. |
With muse.ai embedded video search, you can bring our state-of-the-art video search to any website. Allow your users to navigate your video collection, easily find their topics of interest and get insights that would otherwise take hours or days to discover.
A picture is worth a thousand words, so why not check out some of our demos first:
Conference videos University lectures
You can add video search capabilities using our JavaScript library.
First, load the necessary libraries:
<script src="https://muse.ai/static/js/embed-search.min.js"></script>
Then, declare the search as well as the video grid containers.
<div id="muse-search"></div>
<div id="muse-videos-grid"></div>
Finally, initialize a MuseCollection object by telling it about your website layout.
<script>
  MuseCollection({
    collection: 'TmB8Lt7',
    containerInput: '#muse-search',
    containerResults: '#muse-videos-grid'
  });
</script>
MuseCollection parameters:collection*
stringCollection ID of the video collection you want to embed. You can find it in the URL of a collection.
containerResults*
stringSelector for the video grid container. This also shows search results.
containerInput
stringSelector for the search container.
containerPlayer
stringOptional player selector for where the video will appear after user
clicks one of the search results. If this value is not provided,
clicking a result will display the video in a lightbox.
Ignored when player parameter is provided.
playerOptions
objectPlayer options to be applied when using the default player.
Ignored when player parameter is provided. See player
documentation for available
options.
player
MusePlayerWhen provided, instead of using the default player, use this player to play collection's videos.
style
stringThumbnail style for video listing. Possible values:
tiny, small, large,
detailed. Default: small.
layout
stringLayout of video listing. Possible values:
grid, horizontal. Tip: to achive a vertical
listing, set to grid and limit the container width to
200-300 pixels in CSS. Default: grid.
sort
stringVideo order. Some possible values: title,
uploaded (time when video was uploaded),
added (time when video was added to collection),
views (number of views). Prepend - to
indicate descending order. Default: -uploaded.
toolbar
boolSet this to false to hide the toolbar with search result summary and search result volume control.
cssDefault
boolSet this to false to not apply the default search result and input field styling. You will need to style it yourself (this might involve some work).
* required
MuseCollection methods:setCollection(collection)setCollection (collection) | Load the collection specified by the ID. |
on(event, listener) | Set up a function that will be called when the specified event happens. |
off(event, listener) | Remove a previously set up event listener. |
MuseCollection events:metadata | Collection metadata (such as name, description, videos contained) is ready. The metadata object will be passed to the listener as the first argument. |
select | A video is selected by the user and is about to be played. Video metadata will be passed to the listener as the first argument. |
As an alternative to embedding videos on your website, you can simply download a ready-made fully responsive HTML file and use it on your own website as a standalone page.
Simple page that has the video centered both vertically and horizontally.
Example<div class="container">
<div id="video-player"></div>
</div>
<script src="https://muse.ai/static/js/embed-player.min.js"></script>
<script>
const player = MusePlayer({
container: document.getElementById('video-player'),
video: 'sLFaX4p',
autoplay: true,
loop: true,
volume: 0,
sizing: 'fit',
});
</script>
Simple page that has the video, the video title, and video description, horizontally centered.
Example<div class="container">
<h1 id="video-title"></h1>
<div id="video-player"></div>
<h2 id="video-description"></h2>
</div>
<script src="https://muse.ai/static/js/embed-player.min.js"></script>
<script>
const player = MusePlayer({
container: '#video-player',
video: 'sLFaX4p',
autoplay: true,
loop: true,
volume: 0,
width: 'parent',
});
player.on('metadata', metadata => {
document.getElementById('video-title').innerText = metadata.title
document.getElementById('video-description').innerText = metadata.description
});
</script>Simple two-pane layout with the video and its interactive auto-generated transcipt.
Example<div id="container-video" class="container">
<h1 id="video-title"></h1>
<div id="video-player"></div>
<h2 id="video-description" onclick="expandDescription()">
</div>
<div class="container-transcript">
<div class="header-transcript">
<h2>Transcript</h2>
</div>
<div id="transcript-list">
<table><tbody id="speech-container"></tbody></table>
</div>
</div>
<script src="https://muse.ai/static/js/embed-player.min.js"></script>
<script>
// Load player with video VBdrD8b into #video-player.
const svid = 'VBdrD8v';
const player = MusePlayer({
container: '#video-player',
video: svid,
width: 'parent',
showTitle: false,
});
// Load video's title and description.
player.on('metadata', metadata => {
document.getElementById('video-title').innerText = metadata.title
if (metadata.description.length > 0) {
document.getElementById('video-description').classList.add('show');
document.getElementById('video-description').innerText = metadata.description
}
document.getElementById('video-description').innerText = metadata.description
});
// Highlight the current word.
player.on('timeupdate', function(time) {
document.querySelectorAll('.word').forEach(function(word) {
if (Number.parseFloat(word.dataset.start) <= time && Number.parseFloat(word.dataset.end) > time) {
word.classList.add('current');
word.scrollIntoView({behavior: "smooth", block: "center", inline: "end"});
} else if (word.classList.contains('current')) {
word.classList.remove('current');
}
});
});
// Fetch words and place them insde container-transcript as phrases.
fetch(
'https://muse.ai/api/files/i/speech/' + svid, {mode: 'cors'}
)
.then(function(response) {
return response.json();
})
.then(function(words) {
// Sort words by time.
words.sort((a, b) => a[0] - b[0]);
// Group into phrases.
let phrases = [];
let wordPrev;
words.forEach(word => {
let paragraphStart = word[2] == '\n' || wordPrev && word[0] - wordPrev[1] > 1.2;
if (phrases.length == 0 || paragraphStart && wordPrev[2].trim()) {
phrases.push([]);
}
if (word[2].trim()) {
phrases[phrases.length - 1].push(word);
}
wordPrev = word;
});
// Draw phrases.
let list = document.getElementById('speech-container');
phrases.forEach(phrase => {
if (!phrase.length) {
return;
}
let time = phrase[0][0];
let timeLen = time > 3600 ? 8 : (time > 600 ? 5 : 4);
let timeStart = new Date(time * 1000).toISOString().substr(19 - timeLen, timeLen);
let wordsHTML = '';
phrase.forEach(word => {
const punctJoin = ';:.,'.includes(word[2]);
const classes = 'word' + (punctJoin ? ' punct-join' : '') + ('-–'.includes(word[2]) ? ' punct-space' : '');
const space = punctJoin ? '' : ' ';
wordsHTML += `${space}<span class="${classes}" data-start="${word[0]}" data-end="${word[1]}">${word[2]}</span>`;
});
list.insertAdjacentHTML('beforeend', `
<tr>
<td class="phrase-time">${timeStart}</td>
<td class="phrase">${wordsHTML}</td>
</tr>
`);
});
});
// On word click/touch, seek video to where the word is spoken.
document.addEventListener('click', e => {
if (e.target.classList.contains('word')) {
player.seek(Number.parseFloat(e.target.dataset.start));
player.play();
}
});
function expandDescription() {
var videoDescription = document.getElementById('video-description');
videoDescription.classList.toggle('open');
}
const onScroll = () => {
const containerVideo = document.getElementById('container-video');
const scroll = document.documentElement.scrollTop;
if (scroll > 70) {
containerVideo.classList.add('scrolled');
} else {
containerVideo.classList.remove('scrolled');
}
}
window.addEventListener('scroll', onScroll);
</script>Simple two-pane layout designed for users who want to provide clickable chapters for navigating a video.
Example<div class="container">
<div id="video-player"></div>
</div>
<div class="container-chapters">
<div class="header-chapters">
<h2>Moments</h2>
</div>
<div id="container-list">
<ol>
<li data-start="0.0">Moment One (0s)</li>
<li data-start="2.5">Moment Two (2.5s)</li>
<li data-start="9.7">Moment three (9.7s)</li>
</ol>
</div>
</div>
<script src="https://muse.ai/static/js/embed-player.min.js"></script>
<script>
const player = MusePlayer({
container: '#video-player',
video: 'sLFaX4p',
autoplay: true,
loop: true,
volume: 0,
width: 'parent',
});
document.querySelectorAll('#container-list li').forEach(li => {
li.addEventListener('click', e => {
player.seek(Number.parseFloat(e.currentTarget.dataset.start));
});
});
</script>Group of videos with one player, created by listing their ID's. The videos in a Video Group do not need to be in the same Collection.
Example<div id="muse-video-player" data-width="900"></div>
<div id="vgrid"></div>
<script src="https://muse.ai/static/js/embed-player.min.js"></script>
<script>
const player = MusePlayer({
container: '#muse-video-player',
video: 'R7c1PrQ',
sizing: 'fill',
});
function MuseList(vlist)
{
vlist.map(x => {
fetch(`https://muse.ai/api/files/info/${x}`)
.then(resp => resp.json())
.then(jdata => {
var i = document.createElement( "img" );
i.src = new URL('thumbnails/thumbnail.jpg', jdata.url);
i.onclick = function () {
if (player.options.video === jdata.svid){
player.play();
} else {
player.setVideo(jdata.svid);
}
};
document.getElementById('vgrid').appendChild(i);
})
})
}
var vlist = ['R7c1PrQ', 'cABMGwV', 'x41yzAr', 'PdPox4y', '9Hdap75'];
MuseList(vlist);
</script>